Getting Started
This page is a high-level tour of the ProtoPoke terminal UI: set up a forwarder, watch traffic, intercept and rewrite a frame, and forge new traffic. Each later page in this section (Config, Traffic, Intercept, Forge) covers the same areas in depth.
Launch the TUI
The interface opens with six tabs. You start on Config.
Note
ProtoPoke is laid out for a terminal of at least 960×1040 pixels. On a smaller window some panes, modal fields, and the Cancel/Save buttons may be clipped. Modals scroll internally, so you can still reach every field on a small window, but resizing the terminal up to this size shows the full layout at once.
| Tab | Shortcut | Purpose |
|---|---|---|
| Config | F1 |
Configure forwarders, log level, MCP server. Start/stop proxies. |
| Traffic | F2 |
Live sessions, frames, hex dump, and parsed field view. |
| Intercept | F3 |
Hold frames in a queue: forward, drop, modify. Intercept & replace rules. |
| Forge | F4 |
Build and replay frames as playbooks. Send history. |
| Notes | F5 |
Findings and notes — the cross-session knowledge base. |
| Logs | F6 |
Application log output. |
1. Set up a forwarder
A forwarder is a single proxy: it listens on a local address and relays traffic to an upstream target. On the Config tab, select the default forwarder and click ✎ Edit (or + Add for a new one). At minimum set:
- Type —
TCP,UDP, orSOCKS5 - Listen Host / Port — where your client connects (e.g.
127.0.0.1:8080) - Upstream Host / Port — the real server (TCP/UDP only; SOCKS5 learns the target from the handshake)
Save, then click ⏻ On to start it. Point your client application at the listen address instead of the real server — ProtoPoke relays transparently.

See Config for every field, plus TLS/MITM, log levels, and saving projects.
2. Look at the traffic
Switch to Traffic (F2). It is a three-pane view:
- Sessions — every active and closed connection.
- Frames — the frames for the selected session, with direction and size.
- Detail — the selected frame as a hex dump, or as decoded protocol fields when a protocol definition is loaded (toggle hex/parsed).
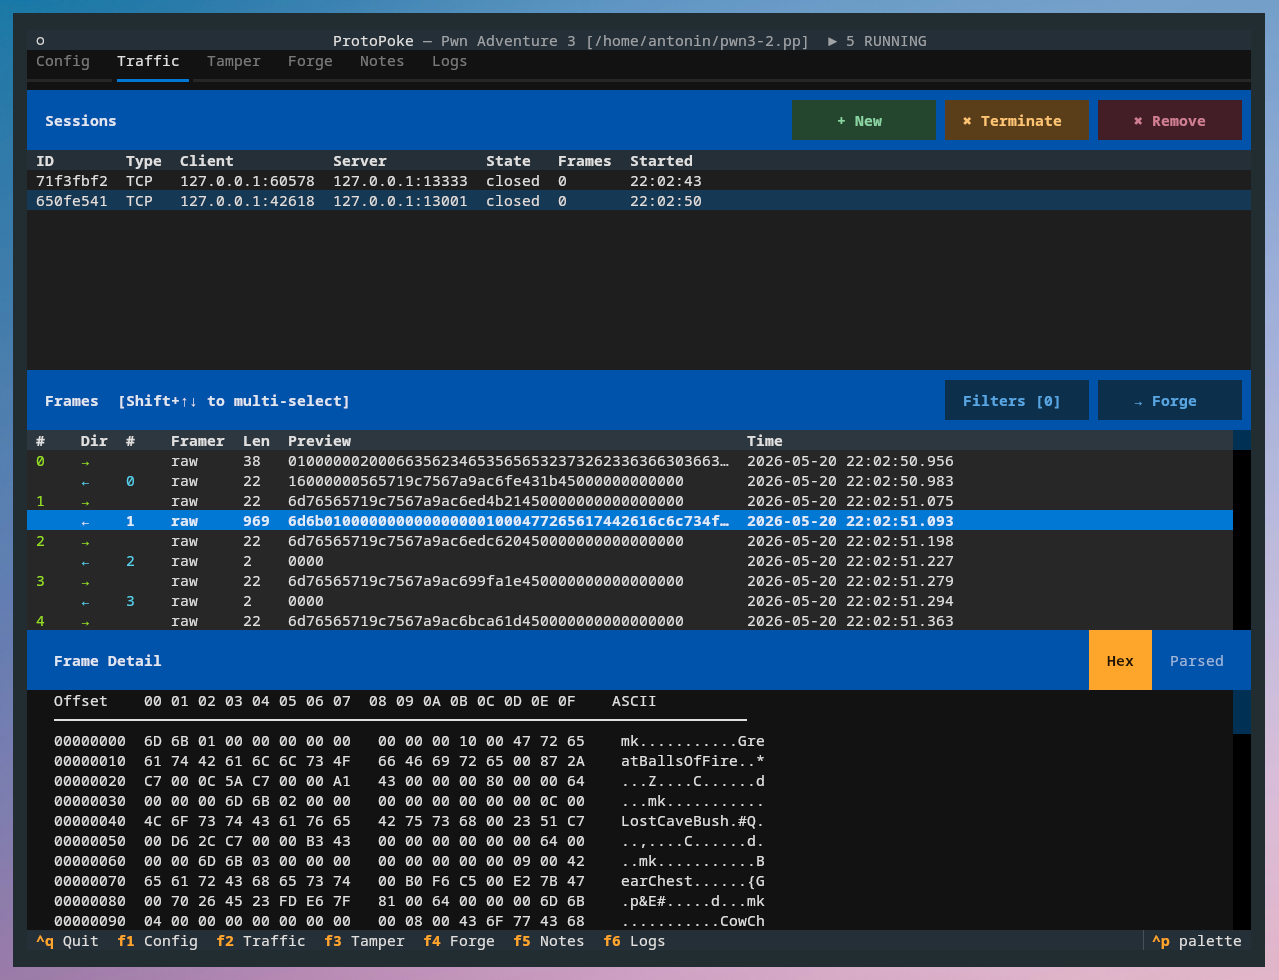
How the raw byte stream is cut into frames is the job of the framer, and how frames are decoded into named fields is the job of the protocol definition. Both are introduced on the Traffic page and documented fully in Framers and Protocol Definitions.
3. Intercept and rewrite
Switch to Intercept (F3) and toggle intercept on. New frames are
now held in a queue instead of being forwarded automatically. For each one
you can:
- Forward — send it unchanged
- Drop — discard it
- Modify + Forward — edit the raw bytes (or parsed fields), then send

Holding every frame quickly gets noisy, so intercept rules let you define exactly which frames to stop. And replace rules are the powerful part: they rewrite byte patterns automatically as traffic flows through — using a binary pattern, a regex, or a custom Python script. See Intercept.
4. Forge traffic
Switch to Forge (F4) to send traffic yourself. There are two ways to
get frames into Forge:
- Send from Traffic — select any captured frame on the Traffic tab and click → Forge.
- Build from scratch — add a new frame and type its bytes in the editor.
Forge is organised around three concepts:
- Playbook — an ordered list of frames aimed at a target. A playbook can open a fresh connection (host/port) or reuse an existing session.
- Frame — one message in a playbook. Edit its bytes, label, and
direction; frames support
{{VARIABLE}}templates. - History — every playbook run is recorded so you can review what was sent and received.

See Forge for the full workflow, including the response window, copying frames between playbooks, and reusing live sessions.
Where next
- Config — forwarders in depth, TLS, logs, projects
- Traffic — reading traffic, framers, parsers, filters
- Intercept — intercept rules and replace rules
- Forge — playbooks, frames, history
- Prefer scripting? → Core Library — Getting Started